miercuri, 2 decembrie 2015

3 brushes challenge - my analogous design

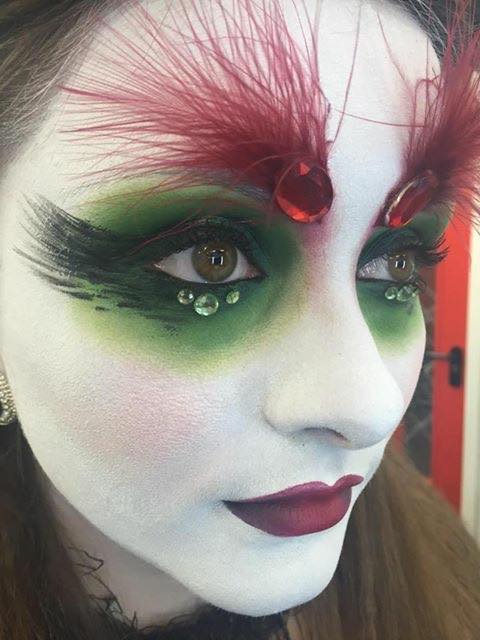
Still can't believe that I did this with only 3 brushes: a blusher/contouring Kryolan brush (natural hair, medium/small), a synthethic lip brush (which is actually a flat synthetic square brush) and a fluffy blending brush Parisax 44. I also used the beautyblender original and micro mini to blend creamy products and to apply powder.


duminică, 29 noiembrie 2015

When Pop Culture and superheroes meet the Elizabethans

The excellent Super Flemish project of French photographer Sacha Goldberger, who transports the Pop Culture and superheroes into classical Flemish painting and fashion of the Elizabethan era… Some gorgeous retro versions of Superman, Batman, Spiderman, Darth Vader, Hulk and so on!


References:


  • When pop culture and superheroes meet classical Flemish painting (2014) Available at: http://www.ufunk.net/en/photos/super-flemish/ (Accessed: 29 November 2015).

sâmbătă, 28 noiembrie 2015

Final evaluation

At the beginning both me and Taylor were a bit afraid that this wouldn't work, but I trusted her and she got better and better everyday. She wasn't so confident in her skills when we first tried to do my design and that's why it was hard to work but with practice she gained confidence and she did it flawless. I know that she didn't do a make-up school/course before and I tried to help her as much as possible to go beyond her limits. She had some blending problems at the beginning, but that's maybe because I didn't know how to explain her better how to realize my design. With time, practice and lots of communication we understood what we want from each other and everything went very well.
I am really pleased of the outcome and how everything turned up. I can say that it was better than I expected considering my crazy design ideas and that Taylor did a great job doing my design. We worked together as a real team and we did our best to meet each other's make-up goals. We have learnt a lot from each other and I feel like this semester not only that improved my make-up skills, but also improved me as a person and my personal skills. Trying to do other's design and pleasing them is not easy but we overcame this and I think that the outcome speaks for itself. Taylor worked really hard do perfect her make-up skills and we met each other to practice my design three times before the assessment. I know that she also did a lot of practice at home and this can be seen through her results. I am very satisfied by how we collaborated and how we worked as a team and I would love to work with her again in the future.

miercuri, 25 noiembrie 2015

Timed assessment - in the role of the designer/assessor

I'm so glad that assessments are finally over! Today was really good, except the fact that I had to rush to had my pictures taken...which happened everytime and which I didn't like, because everyone was queuing to take photographs and everyone was stressed. I hope that next time won't be the same and that we'll have enough time to take beautiful pictures of the design we worked, both make-up artist and designer, so hard. Yep, that was the only part of the assessment that really bothered me. I hope I won't have to get used to it and that something will be done regarding this...

Taylor did a wonderful job. She practiced my design before like crazy, we met third times before to practice and I know that she practiced at home a lot on her friends an on herself. She even bought the products that I had extra for my look so she could recreate it entirely at home. I am really proud of her progress and she really showed me that if she wants to go over her limits, she can! I am really pleased by our collaboration so far, and by the result of the assessment as well. She was really professionally, dressed all in black, with her hair tied back and without dangling jewelry. She took all the health and safety measures and always asked me if I feel ok during the assessment, just as usually. She finished in time and she also helped me to do my hair quickly before we took photos. We were a bit stressed over this but during it we relaxed, thanks to Sue who put us awesome music. It didn't really feel like an assessment which, for me, was great, because back in my country assessments, exams etc are VERY very stressful and teachers put a lot of pressure on us, which I believe is terribly wrong.

Overall, as the designer and assessor, I am happy with the result and I can't wait to see the final pictures and how teachers will react to what I did. I feel really proud of Taylor's work, of how we got better together a a team and as individual human beings and artists :)) and... of me. Because I really love what we did! (Although I slept only 3 hours last night because I had to do my handmade crown...and to make sure I am prepared for everything... everything was perfect in the end. I stressed more over Taylor's assessment rather than about mine, I don't know why. Maybe because it was my design and I really wanted everything to be perfect.)


Me and Taylor after the stress was over


Me and my uni best friend, Lia, the new Elizabethans :))


And here a couple of selfies.

miercuri, 18 noiembrie 2015

Third practice of my design

taylor third practice photos

Today was a really good day. I am so excided about the final result and really pleased by Taylor's improvement. Everything went good and we also timed ourselves to know if we are in time and it was ok. Taylor also suggested an idea for improving the eyeliner which was great and so we did.


Step by step to achieve the look, products and ustensils used:


1. Cleanse and tone the face, and then put just a bit of moisturizer on your hands and gently rub it into the skin;
2. Using a flat foundation brush, spread white Supracolor all over the face. Make sure you don’t have any patches on the face and that the product is distributed evenly, blend with the same brush where necessary;
3. Blend the product that remained on the brush on the neck and ears;
4. With a clean, flat, natural hair brush, blend the product in the eye area, up towards the lower and the upper eyelid;
5. Using another flat foundation brush, sink it in a little bit of water and then apply white facepaint all over the face, excepting the eye area. There you just have to blend a little so it won’t be a harsh line of facepaint;
6. With the same brush, cover the outer ends of the eyebrows with facepaint and then blend a little on the edges, so they’ll be completely covered;
7. Using a puff, set everywhere with a lot of baby powder, excepting the eye area that needs to be unset so you can blend the green Supracolor;
8. With a small black fluffy brush, apply green Supracolor, blending it with a clean brown fluffy brush without extending it too much;
9. Put loose powder underneath the eyes to prevent any fall out, using a medium fan brush;
10.  With a flat brush, set the green Supracolor with dark teal-green eyeshadow all over the mobile eyelid and underneath;
11.  Brush out the loose powder underneath with the medium fan brush;
12.  Blend with clean blending brush the dark teal green around the eyes;
13.  Blend around the dark teal-green with the lighter shade of green without pressing too much on the blending brush, so you could create a nice transition between the colors;
14.  Blend with the light yellow the edges, really soft, without pressing, using a clean blending brush (you can clean the same brush you have used already and continue with it);
15.  Put green Supracolor on the middle of the eyelids using a flat brush and then put the glitter with a small blue brush-concealer brush and then blend the glitter a bit at the edges;
16.  Add the messy black eyeliner, let me line my waterline first;
17.  Add a bit of blended red on the inner corners of the eyebrows with a fluffy blending brush, so you can help the gems to look not so harsh;
18.  Put a bit of latex on the back of the gem with the metal spatula, let it dry a few seconds, and then place it in the inner corner of the brow, inclined a bit;
19. Apply the green little gems under the eyes;
20.  Add Kryolan blusher on the apples of the cheeks, without making it too harsh - use your blusher blush to add color and my blusher brush to blend the edges;
21.  Do the lips with dark red Supracolor and a flat synthetic brush and then create an ombre by adding black Supracolor in the outer corners of the lips. Try to overdraw the lips pretty much and to correct them with white where necessary so they will be really nice and defined. After you have done the lips, the look is complete.

Timed assessment - in the role of the make-up artist

I feel like Taylor's design was quite a challenge for me even if I did a make-up course of 4 months before and I've done make-up on many people before, because this time I couldn't use powders to set the base. Everything was cream based and it wasn't that easy for me because I wasn't used with cream contour, especially on blending it on a white base. Also I was skeptical when it came to use vaseline on the top of what I've done with make-up as Taylor said because I thought that the make-up underneath will move and will cause patches. I am happy that I didn't use vaseline to achieve the sweaty look because I truly believe that it would ruin everything and instead I opted for a dewy finish face spray by NYX who did it's job. Everything went well except at the end when I had to wait too much to take pictures of my work and the make-up, not being setted with powder, creased. But I don't really think that this was y fault because I did everything what was necessary... you just can't stop cream products to crease after a whort amount of time of you don't set them with powder.
Anyway I am pleased of how my timed assessment went and I hope that everything will be fine in the end.

marți, 17 noiembrie 2015

Second practice of Taylor's design

This time I really improved my cream contouring skills and I made the contour lighter, just as Taylor wished to (I hope). She seemed to be very pleased by the result because we followed all the steps for her design, including adding the extra things. I felt like the design looked better this time and the hickeys were smaller and more realistic too. The only thing which I didn't really liked was that Taylor incorporated vaseline in her design, to give a sweaty finish, but I thought that spraying dewy setting spray would be enough, because I was afraid that I will ruin the whole look if I'll try to add vaseline with the kabuki brush or with the fingers over a cream based base without any powder setting. What I was afraid of really happened - everything was perfectly fine until I added the vaseline, which caused the Illamasqua skin base foundation with the max strobe cream to move and it appeared patches on the skin... I'm not so sure if I'm going to add vaseline at the assessment as it is really tricky and can ruin the whole look in just one second.
Overall the good thing was that it didn't took me as much time as it took me before and everything seemed to be easier to follow because I already knew what's going to come next.

Unfortunately I only took one picture, where the hickeys can't really be seen, because I was in a hurry: